本教程是关于Substance Painter角色脸部纹理贴图制作大师级教程 Character Face Texturing in Substance Painter Final Product,时长:5小时,大小:5.8 GB,MP4高清视频格式,教程使用软件:Substance Painter 7.4,Maya 2022,附源文件,作者:Henning Sanden,共19个章节,语言:英语。
在Substance Painter中的人物脸部纹理,你将学习如何在Substance Painter中从头开始对人物脸部进行纹理!学习从第一笔画到皮肤着色器的最后调整的完整工作流程。学习从第一笔画到皮肤着色器的最后调整的完整工作流程。在本课程结束时,你将能够使用简单而强大的技术为自己的角色进行贴图。
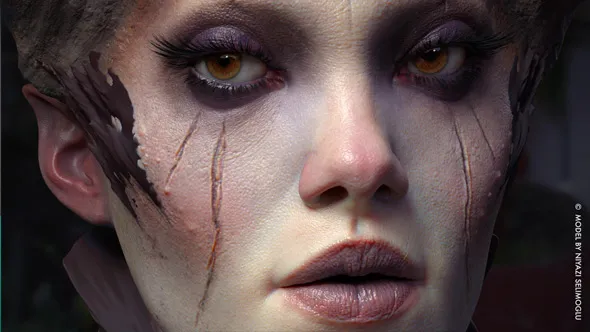
我们将专门关注脸部,因为它通常是最复杂和最重要的部分。这将使我们能够讨论诸如面部轮廓、化妆、微观细节、角色个性以及如何解决你在工作中遇到的常见纹理挑战等话题。如果你能对脸部进行纹理处理,你就能对任何东西进行纹理处理!
关于您的导师
您的导师Henning Sanden已经从事3D工作15年了。在他的电影经历中,他曾参与过《异形之约》、《加勒比海盗》、《毒液》、《环太平洋》《蝙蝠侠5超人》等电影。本系列所展示的技术是基于他的电影生涯,他曾作为一名纹理艺术家工作了多年。
涵盖整个贴图过程
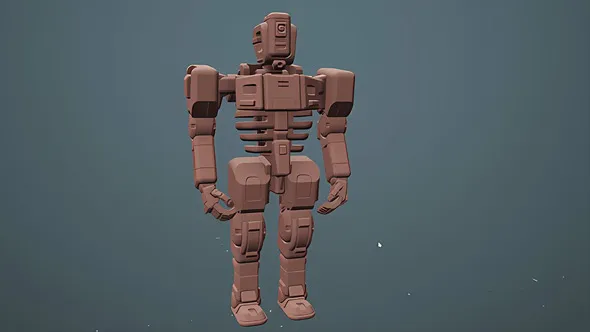
我们首先将我们的模型从ZBrush中导出,并将其导入Substance Painter,涵盖所有具体步骤和设置。在这里,我们将结合新的翘曲投影功能,使用可平铺的贴图为角色提供皮肤细节。在这个过程中,你将学习使用智能面具的强大技术,以大大加快纹理的速度。一旦我们的皮肤细节完成了,我们就开始使用填充图层制作色彩图谱,一次创建一个图层。你还将了解如何创建简单而强大的粗糙度贴图,使你的角色变得流行。
皮肤着色变得简单
在完成所有基础贴图的第一遍后,我们将把纹理带入Arnold,在那里我们将设置皮肤着色器。皮肤着色是一个非常复杂的过程,所以我们一定要让它简单易懂。随着第一遍皮肤着色的完成,这一步就是角色的形成。我们还使用了FlippedNormals眼睛套件,以使角色真正感觉到活着。
专业和经过测试的纹理工作流程
你将学习一种整体的贴图方法,包括Painter中的贴图以及Arnold中的皮肤着色。这是一种快速且经过行业验证的工作方式,为你未来的所有角色提供一个坚实的框架。
技能水平
在Substance Painter中进行角色贴图,非常适合对Substance Painter和Maya有中级了解的3D艺术家,他们有兴趣将自己的角色贴图提高到一个新的水平!我们建议你了解如何使用Painter和Maya。我们建议你知道如何使用 Substance Painter 和 Maya,因为我们的重点是纹理和阴影工作流程,而不是通过功能 A-Z。如果您有兴趣学习 Substance Painter 或 Maya,我们强烈推荐我们的入门课程。
Maya简介
Substance Painter简介
您将学到的内容
从ZBrush导出模型并将其导入Substance Painter
设置智能面罩以实现高效的工作流程
在 Substance Painter 中使用 Warp Projection 来快速添加毛孔
使用自定义字母来添加皮肤细节
逐步建立一个颜色地图
制作粗糙度贴图
制作SSS数量图
从Substance Painter导出贴图
从ZBrush导出位移图
阿诺德的皮肤着色
如何使用一个经过测试的简单贴图工作流程
内容包括:
在进行逼真的贴图和角色工作时,特别是皮肤,你需要依靠外部资源来达到满意的效果。我们将提供本教程中所使用的外部资源的低分辨率版本,这样你就可以在不需要购买任何额外产品的情况下进行学习。
19个视频教程
所有场景文件(Maya, ZBrush, Painter)。
10页帮助PDF
Niyazi Selimoglu的角色模型
1个来自FlippedNormals Face Kit的全脸alpha的低分辨率版本
来自FlippedNormals皮肤套件的3个低分辨率版本的阿尔法值。
1个来自FlippedNormals眼睛套件的低分辨率版本的眼睛。
章节列表:
01 – 工作流程说明
02 – 建模与贴图
03 – 网格准备
04 – 智能面罩
05 – 毛细孔投影
06 – 毛细孔贴图
07 – 喇叭位移
08 – 毛细孔固定
09 – 位移平衡
10 – 颜色基础
11 – 角部基础
12 – 粗糙度基础
13 – 颜色断裂
14 – 骨骼基础
15 – Maya场景设置
16 – 皮肤着色
17 – SSS 数量图
18 – 贴图更新
19 – 眼睛套件
Character Face Texturing in Substance Painter
In Character Face Texturing in Substance Painter, you’ll learn how to texture a character face from scratch in Substance Painter! Learn the full workflow from the first brush stroke to the final tweaks of the skin shader. By the end of this course, you’ll be able to texture your own characters, using simple and powerful techniques.
We’ll be focusing exclusively on the face since it’s commonly the most complicated and important part. It’ll allow us to talk about topics such as facial contouring, makeup, micro detailing, character personality, and how to solve common texturing challenges you’ll encounter in your work. If you can texture the face, you can texture anything!
ABOUT YOUR INSTRUCTOR
Your instructor, Henning Sanden, has been doing 3D for 15 years. During his film experience, he’s worked on movies such as Alien Covenant, Pirates of the Caribbean, Venom, Pacific Rim: Uprising, Batman V Superman – and many more! The techniques shown in this series are based on his career in film, having worked as a texture artist for years.
COVERING THE FULL TEXTURING PROCESS
We’re starting by exporting our model out of ZBrush and importing it into Substance Painter, covering all specific steps and settings. From there we’ll give the character skin details using tileable maps in combination with the new Warp Projection feature. Along the way, you’ll learn powerful techniques using Smart Masks to significantly speed up texturing. Once our skin details are done, we’re starting on the color map using fill layers, creating the color map one layer at a time. You’ll also understand how to create simple and powerful roughness maps to make your characters pop.
SKIN SHADING MADE SIMPLE
Having done the first pass on all the base maps, we’re bringing the textures into Arnold, where we’ll set up the skin shader. Skin shading can be an incredibly complicated process, so we’ll be sure to make it simple and easy to understand. With a first pass of the skin shading done, this is the step where the character is coming together. We’re also using the FlippedNormals Eye kit, to make the character feel truly alive.
PROFESSIONAL AND TESTED TEXTURING WORKFLOW
You’ll learn a holistic way of texturing, covering both texturing in Painter as well as skin shading in Arnold. This is a fast and industry-proven way of working, giving you a solid framework for all your future characters.
SKILL LEVEL
Texturing a Character in Substance Painter is perfect for 3D artists with an intermediate understanding of Substance Painter and Maya and who are interested in taking their character texturing to the next level! We recommend that you know how to use both Substance Painter and Maya, as we’re focusing on texturing and shading workflows, instead of going through features A-Z. If you’re interested in learning Substance Painter or Maya, we highly recommend our Intro Courses:
Introduction to Maya
Introduction to Substance Painter
WHAT YOU’LL LEARN
Exporting models from ZBrush and importing them into Substance Painter
Setting up Smart Masks for an efficient workflow
Using Warp Projection in Substance Painter for quickly adding pores
Using custom alphas to add skin details
Building a color map step by step
Making a roughness map
Making a SSS amount map
Exporting maps from Substance Painter
Exporting displacement maps from ZBrush
Skin shading in Arnold
How to use a tested and simple texturing workflow
CONTAINS
When doing realistic texturing and character work, particularly skin, you will need to rely on external resources to achieve a satisfying result. We will be providing low-res versions of the external resources used in this tutorial so you can follow along without having to purchase any additional products. Below you’ll find links to the resources in case you wish to buy the full version.
19 Video Tutorials
All scene files (Maya, ZBrush, Painter)
10 Page Help PDF
Character model by Niyazi Selimoglu
1 low-res version of the full face alpha from FlippedNormals Face Kit
3 low-res versions of alphas from FlippedNormals Skin Kit
1 low-res version of an eye from FlippedNormals Eye Kit
SOFTWARE USED
Substance Painter 7.4
Maya 2022
CHAPTER LIST:
01 – Workflow Explained
02 – Modeling is Texturing
03 – Mesh Prep
04 – Smart Masks
05 – Pores Projection
06 – Pores Tileable
07 – Horn Displacement
08 – Pore Fixes
09 – Displacement Balances
10 – Color Base
11 – Horns Base
12 – Roughness Base
13 – Color Breakup
14 – Bone Base
15 – Maya Scene Setup
16 – Skin Shading
17 – SSS Amount Map
18 – Map Updates
19 – Eye Kit
©版权声明
「特别说明」易光易影(www.yigyiy.com)收集的资源仅供内部学习研究软件设计思想和原理使用,学习研究后请自觉删除,请勿传播,因未及时删除所造成的任何后果责任自负。如果用于其他用途,请购买正版支持作者,谢谢!若您认为 易光易影(www.yigyiy.com)发布的内容若侵犯到您的权益,请点击此处侵权反馈。我们将第一时间配合处理!


评论0